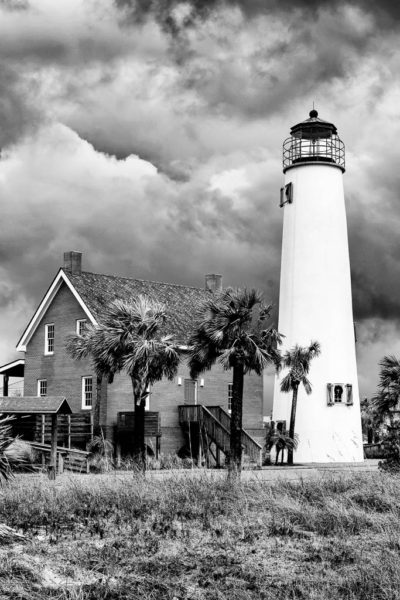
The first thing you see when you drive into St. George Island is the 72-foot tall Cape St. George Light. It is a popular photographic subject, and you can find numerous pictures of the lighthouse on Google. I have been to St. George Island several times over the last few years, and I always end up at the tower with my camera.
The lighthouse has had a bit of a rough life over the years having fallen twice since construction was originally completed in 1833. After a hurricane undermined the poorly built foundation in 1850, another hurricane in 1851 toppled the tower. The lighthouse was reconstructed, but the tower was again damaged by a tropical storm in 1878; Hurricane Opal in 1995, which shifted the tower off its foundation causing it to tilt; and Hurricane Georges in 1998.
Repairs to the tower were completed in 2002, but continued exposure to the surf weakened the foundation until the lighthouse collapsed, for the second time, into the Gulf of Mexico in October 2005. Efforts were made to recover as much of the lighthouse as possible. Volunteers cleaned thousands of recovered bricks, and the tower was rebuilt at its current location using the original plans held by the National Archives in Washington, D.C. After three years of painstaking work, the Cape St. George Light was opened to the public in December 2008.
I found this particular composition during our evening dog walk the previous day. Handholding the camera, I took several shots, but I wasn’t completely satisfied with them. So, I decided I would go back the next day with my tripod to try again.
My original plan for the shot was to use a small aperture and low ISO and let the shutter speed be as slow as it needed to be. However, the next day, with a heavily overcast sky and a pretty stiff wind, I knew my original plans would no longer work.
I needed to address two concerns before I snapped the shutter. First, I had to maintain complete depth of field, which would require a relatively small aperture. Second, I did not want the leaves and grasses to be blurred by the blowing wind, which would require a fast shutter speed. Given the day’s overall light level, the only way I could get the settings I needed was set the shutter speed and aperture in manual mode, and let the camera determine the proper ISO setting.
Of course, the noise that a higher ISO would create was also a concern, but I figured that could be handled later with noise-reducing software. Regardless, if I wanted to get the shot that was the only way I was going to get it.
Because the lighthouse was relatively far away from where I was set up, I decided that using the smallest aperture wasn’t necessary. Rather, a moderate aperture, f/11, would be sufficient to maintain depth of field.
Determining the shutter speed was little more challenging. I needed a shutter speed that was fast enough to stop the motion in the leaves, but I didn’t want it so fast that it would raise the ISO to an unnecessarily high level. But stopping leaf movement was paramount, so I chose a shutter speed of 1/500 second and let the ISO fall where it may. When I checked the settings, I was pleasantly surprised to find that the camera had determined the necessary ISO to be 500, which is only 1/3-stop faster than the 400 ISO I typically use.
One final concern I had was the sky. I knew the overcast sky would be recorded as a very light featureless expanse. There was nothing I could do about that at the time, but I knew I could address that issue by replacing the sky later in Photoshop.
Once I processed the file in Adobe Camera Raw, I opened the image in Photoshop to replace the sky with something a little more dramatic and in keeping with my vision for the picture. Looking through my folder of various skies, I found one that fit what I had in mind.
I tried several different methods to incorporate my chosen sky background into the picture. But, nothing was working the way I needed it to, so I decided I needed to take a break. I started looking through some YouTube videos when I came across one that demonstrated a technique for getting rid of a background. Watching the video, I thought this method could work very well with this photograph. You can watch the video here for the details, but the essence of the process is to create a solid color layer, duplicate the background layer, and then use the Background Eraser Tool to remove the areas of the duplicate background layer you don’t want.
Using this method, I was able to create a solid color background which I was able to select with the Magic Wand tool and then copy and paste the new sky into the selection. Finally, I moved the new sky into the position I wanted.
Once this was done, I then applied the Nik’s Silver Efex Pro 2 filter. This converted the image to a black and white photograph that further enhanced the new sky. A few more minor adjustments gave me the photograph I had set out to create.
Settings: 62mm, 1/500 sec, f/11, 500 ISO

Pingback: 2018 Year in Review | Bob Henry Photography