Our world is three dimensional; it has length or height, width, and depth. When we look out from a scenic overlook at, say, the Grand Canyon, we intuitively recognize all three dimensions. We can see how tall the canyon walls are, how wide it is, and how it seems to stretch as far as the eye can see.
But, photography is a two-dimensional world. A photograph has only length/height and width; it does not have depth. When was the last time you heard someone describe the dimensions of a photograph as “8 inches by 10 inches by 2 inches?”
A sense of depth is often an important aspect of a photograph. Without it, a scene will appear very flat because, well, it is. So, how does one take a three-dimensional subject, capture it to a two-dimensional image, and, yet, create an appearance of depth? That is one of the challenges of photography.
Many years ago, on what was probably my second trip to Great Smoky Mountains National Park, my wife and I visited the well known Clingmans Dome. Clingmans Dome has the distinction of being the highest point in both the Smoky Mountains and the state of Tennessee. With its 45-foot observation tower, it is quite the tourist attraction. The tower provides some spectacular views, and, on days when the air is very clear, visibility can stretch to 100 miles.
When we arrived it was relatively late in the evening. While it was still pretty bright, it wasn’t going to be long before the sun set. So, we walked up the trail to the tower, took in the views, and departed. With all the people that were milling around on the observation deck, photography from that location was out of the question.
When we arrived back at the parking lot, I noticed the sun was beginning to set behind the distant mountains. As we waited, the parking lot cleared out, and I was somewhat amazed that so few people had actually stopped to take in what was quickly becoming an amazing natural light show.
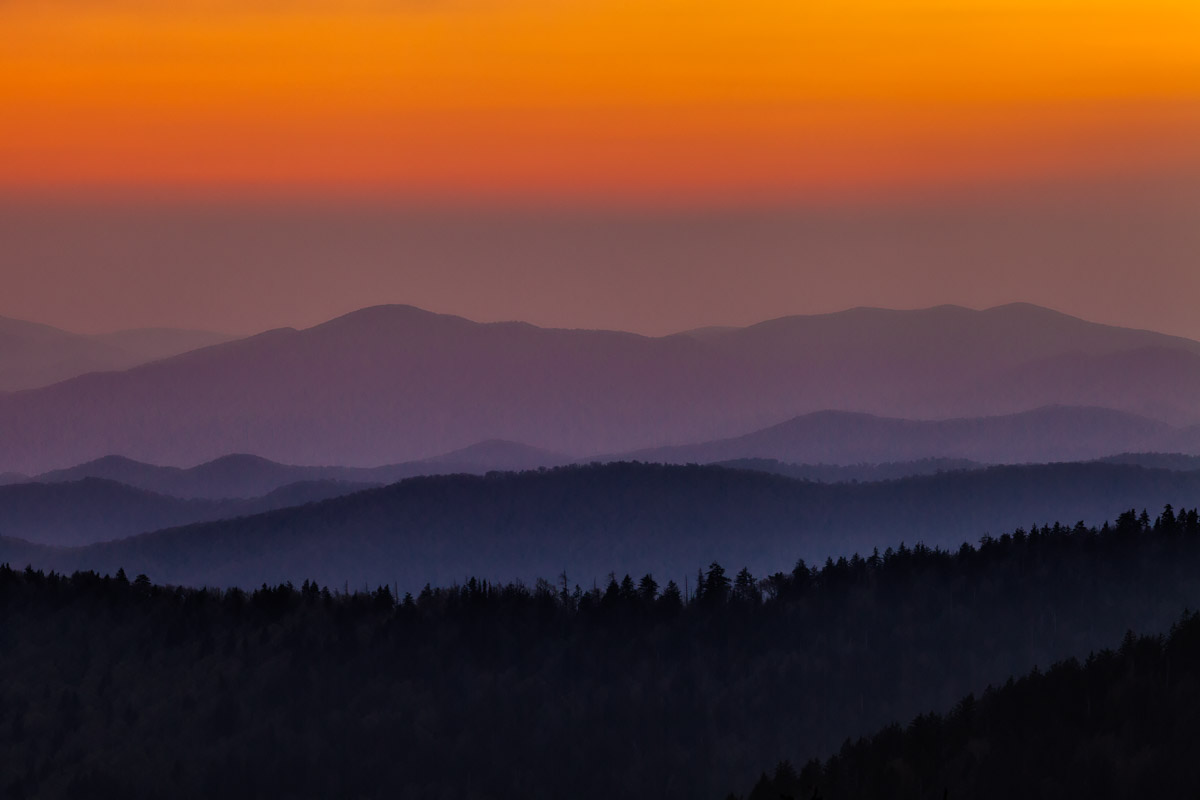
As the sun dropped below the mountains, the mountains were plunged into deep shadows, but the sky overhead began to glow orange. I had already set up the camera and tripod and, with my 70-200 mm lens, framed up this scene. Then, when the color reached its peak intensity, I pressed the shutter button and captured this scene.
When I was composing this image, one of the most important factors I considered was how to create the appearance of depth. In this photograph, I accomplished this by using the various layers of mountains with atmospheric perspective. How does this work?
Again, imagine standing at that scenic overlook. As you gaze upon the scene, the areas closest to you will appear darker, sharper, and more saturated. As you look further and further out, you have to look through air that grows increasingly thicker with distance. This causes more distant areas to appear lighter, less sharp, and less saturated. This phenomenon is known as atmospheric perspective.
By combining atmospheric perspective with the various layers of a scene, a photographer can create the illusion of depth. In this image I photographed in the parking lot at Clingmans Dome, you can see this at work. The closest ridge, in the bottom right corner, is extremely dark, almost black. But as you get to the next ridge, it is a little bit lighter and seems to be farther away. This continues all the way to the farthest ridges.
If you don’t think this combination of layers and atmospheric perspective works, cover the bottom half of the image and see if you still get the same sense of three-dimensionalism (Is that even a word?). I’d be willing to bet you don’t.